How Well Will LinkedIn AIHawk Work?
My friend and AI Engineer, Alex Jacobs, forwarded me this repo that uses AI to auto-fill and apply to jobs in LinkedIn.
Tutorial Roundup
Today we will be following the README tutorial by Federico (feder-cr) for “Auto Jobs Applier AIHawk”.
LinkedIn AIHawk
🤖🔍 Your AI-powered job search assistant. Automate applications, get personalized recommendations, and land your dream job faster.
Find it here: LinkedIn AIHawk
What an awesome use of AI!
We’ll be following instructions from the AIHawk README word for word. To avoid redundancy, I’ve only copied any instructions that I had issues with or commented on.
Anything marked with 🐄Hold Up🐄 is where I had issues or went a little bit off the path of instructions.
Anything marked with 🤠Tidbits🤠 is helpful info I found out along the way.
Let’s try to install and submit some job applications with AIHawk!
Here goes nothing!
Installation
1. Download and Install Python.
If you’re interested in how I installed Python on my new MAc M3 Pro, check out my other post HERE.
2. Download and Install Google Chrome.
🤠Tidbits🤠
Do yourself a favor and go ahead and log-in to LinkedIn on Chrome. It will try to do that when you first run the main script anyways.
3. Clone the repository.
Open your terminal and run:
git clone https://github.com/feder-cr/LinkedIn_AIHawk_automatic_job_application
cd LinkedIn_AIHawk_automatic_job_application
🤠Tidbits🤠
I prefer to use Pycharm IDE Community Edition (Free) when managing my repos locally. I utilized the “Get from VCS” option when creating a new project and utilized AIHawk’s github http link to import the entire repo into my local projects. But feel free to clone the repo as shown above!
🐄Hold Up🐄
After pulling the repo from Git, it gave me an error in Pycharm that I didn’t have Python veresion >= 3.10. That’s not true, because I just installed 3.12.
For me, running “python3 --version” printed “Python 3.9.6”.
That’s because Mac comes with a default installation of 3.9. So we need to tell Pycharm to use the 3.12 version.
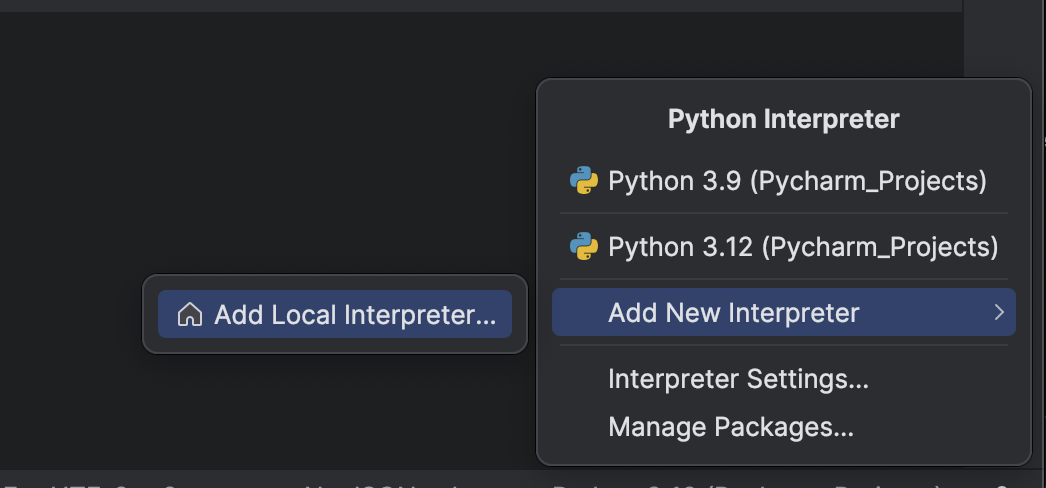
We can do that by changing our Python Interpreter in Pycharm.
- Go to the bottom right side of Pycharm application and click on “Pycharm Interpreter”.

- Click Add New Interpreter.
- Click Existing.
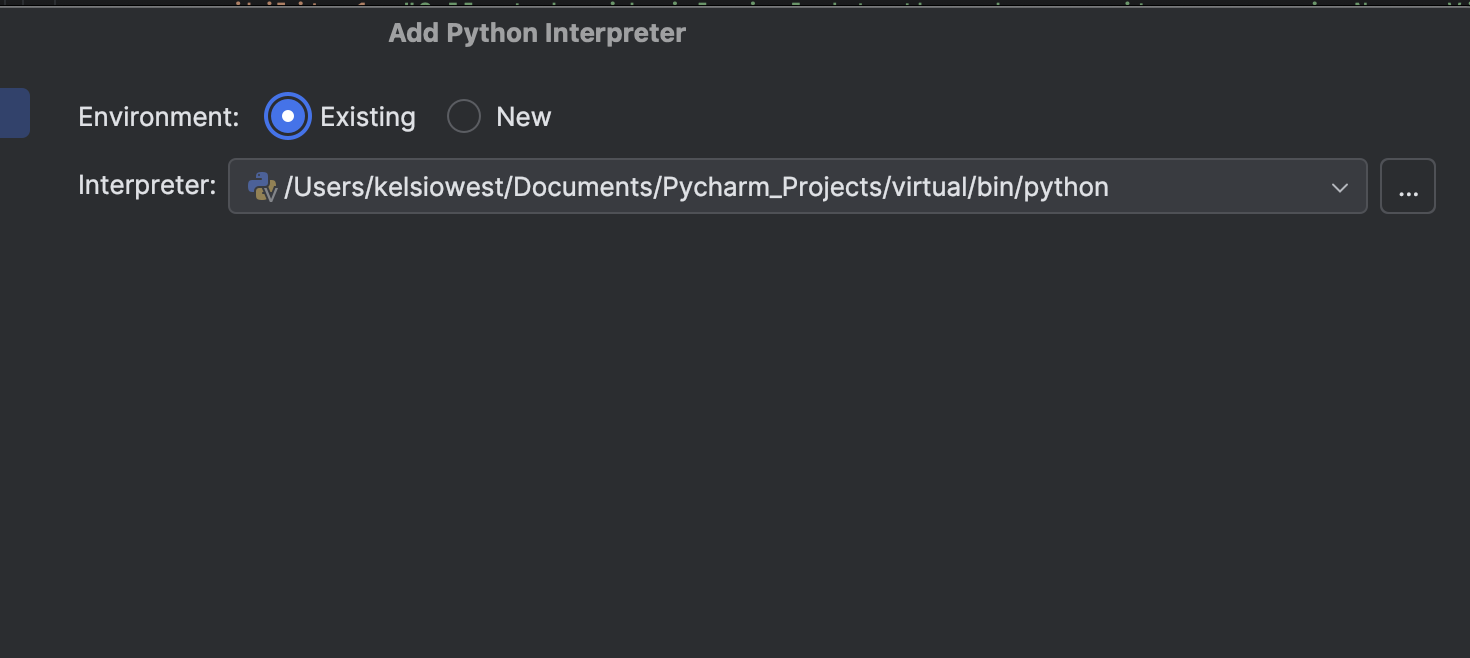
- Then locate to the location of Python 3.12 (or any Python version >=3.10).
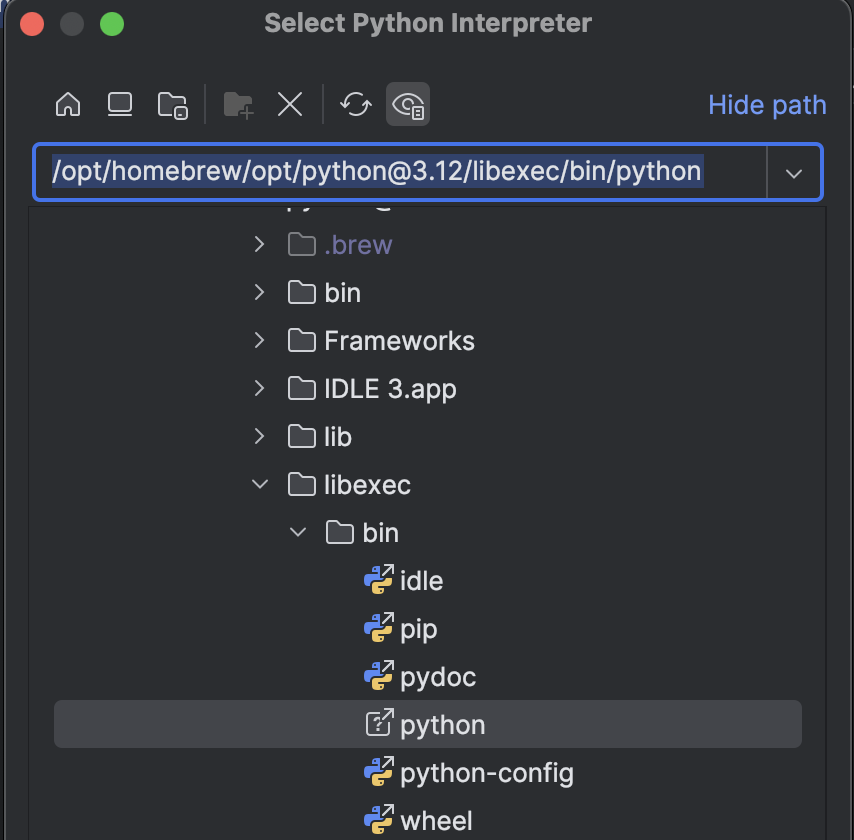
- You can run “
which python3.12” or “which python3”, to find the location of Python. - Navigate to that location and add that as the new interpreter.
Now back to the tutorial.
4. Activate virtual environment.
Kelsis-MacBook-Pro ~ % python3 -m venv virtual
Kelsis-MacBook-Pro ~ % source virtual/bin/activate
5. Install the required packages:
Kelsis-MacBook-Pro ~ % pip install -r requirements.txt🐄Hold Up🐄
This didn’t work for me since the generic pip goes back to version 3.9 that comes with Mac as default. So I updated this line of code to:
pip3.12 install -r requirements.txtAnd SUCCESS! Installed!

Configuring the files provided with AIHawk
1. secrets.yaml
🤠Tidbits🤠
Make sure your email and password are correct.
With some passwords saved, it’s always good to confirm before you have to deal with an error message.
To test this, I just logged out and back in with just using my email (not my saved google email).
When obtaining the API key, it was pretty self-explanatory from the link they provided above. I did have to verify my account with my phone number before it would let me create one.
I also needed to add credit to my account. That was also self-explanatory.
I have no idea at this point how much this will cost.
Depending on the number of job titles and locations you use, I imagine it may use more of the OpenAI resources.
I gave my account $10. And set an alert to email me at $6 to re-up my account if I choose.
I’ll update this post on the cost if it’s a major hinderence to using AIHawk.
2. config.yaml
positions:- List job titles you’re interested in, one per line
- Example:
- List job titles you’re interested in, one per line
positions:
        - Software Developer
- Data Scientist🤠Tidbits🤠
This is where the time/costs comes in to this tool. This can also be tricky to nail the titles just right. For my choices in Bioinformatics, I’ve applied to numerous different titles and it really varies based on companies. So to fill this out, I just took the most common ones from previous applications and added them here. Mine looks like:
positions:
  - Senior Bioinformatics Scientist
  - Lead Bioinformatics Scientist
  - Computational Biologist
  - Senior Computational Biologist
  - Applied Computational Biologist
  - Bioinformatics Scientist
  - Bioinformatician
  - Bioinformatics Engineer
- Senior Scientistlocations:- List locations you want to search in, one per line
- Example:
locations:
      - Italy
      - London
🤠Tidbits🤠
I’m only looking for remote, because there isn’t much in my direct area in Texas. So I put United States, and Texas as my two locations.
companyBlacklist:- List companies you want to exclude from your search, one per line
- Example:
companyBlacklist:
      - Company X
      - Company Y
🤠Tidbits🤠
Probably all the companies you have worked for in the past. Unless you enjoyed them, of course.
3. plain_text_resume.yaml
🤠Tidbits🤠
While this file is very self-explanatory, it is a bit of a hurdle to get through. I recommend using ChatGPT to try to autofill this file as much as possible.
- Copy and paste the plain_text_resume.yaml into ChatGPT. You can tell ChatGPT to stop the response.
- Then copy and paste your resume text into ChatGPT and ask it to fill out the previous yaml file with this resume.
It won’t be perfect and ALWAYS make sure to double-check the answers, but it saved me a lot of time!
Let’s tip our hats to the data_folder_example directory!
🤠Tidbits🤠
Kudos to feder-cr and AIHawk for great examples. This folder is gold.
Examples are what I live by and if you didn’t read anything above, these examples are great and should get you mostly there.
Usage
Run the Bot:
LinkedIn_AIHawk offers flexibility in how it handles your pdf resume:
- Dynamic Resume Generation:
- If you don’t use the
--resumeoption, the bot will automatically generate a unique resume for each application. This feature uses the information from yourplain_text_resume.yamlfile and tailors it to each specific job application, potentially increasing your chances of success by customizing your resume for each position.
- If you don’t use the
python main.py- Using a Specific Resume:
- If you want to use a specific PDF resume for all applications, place your resume PDF in the
data_folderdirectory and run the bot with the--resumeoption:
- If you want to use a specific PDF resume for all applications, place your resume PDF in the
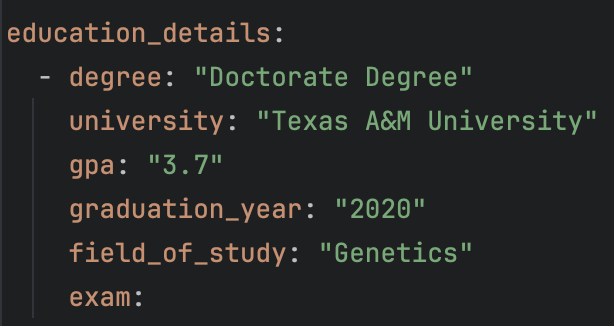
python main.py --resume /path/to/your/resume.pdf🐄 Hold Up🐄
I ran the following line of code:
Kelsis-MacBook-Pro ~ % python main.py --resume data_folder/kw_resume.pdfI had several very helpful error messages pop up.
This was related to exam and link missing in my Education and Project sections.
I simply added those lines back into the yaml, but did not provide a key for them, just left them blank.
🤠Tidbits🤠
I love that we have options here. I did use a specific resume, since I had one on file.
I’m not sure how it affects the application process or how well AIHawk works, but I’ll try both and find out.
SUCCESS

Kudos to feder-cr and AIHawk for creating this tool and more importantly, having thorough instructions for users to follow along. Getting this up and running within a couple hours is extremely impressive and that is owed to the great documentation and development. Who knows, maybe it’ll land me a job! I’ll update on how accurate it is and what jobs it applied to for me!
Final Marks
| Factor | Score |
|---|---|
| Clarity | 3.75 |
| Organization | 4 |
| Visual Aids | 4 |
| Examples | 5 |
| All Links/Files Provided Work | 5 |